| Scottish Executive Statistics |
| Actually changing the lists, networks |
PLEASE TRY TO DO THIS IN ONE SESSION
WITH MINIMUM ERRORS...Set aside an hour to do the job in one go.
Try to keep the number of changes to a minimum by avoiding mistakes if possible.
Think carefully about which list to put where if you do not accept our recommendations,
above
Consider how best to reduce the length of the items (20-25 letters only) and
try to get it right first time
If you get a warning about the number of changes you are making, do not be too
concerned unless it says how many are left...only bureaux who have really messed
about with their stats setup should see this...but don't ignore it completely...there
IS a finite maximum number of changes...dont waste these with unnecessary mistakes.
Procedure for changing the lists
Print out these instructions if necessary and make sure you have the SE instructions
handy
The lists are actually changed on the Options/Supervisor/Statistics screen.
On your chosen PC. Start PGdebt using the supervisor password, if one has been
set up.
Go to the Options/supervisor/statistics screen.
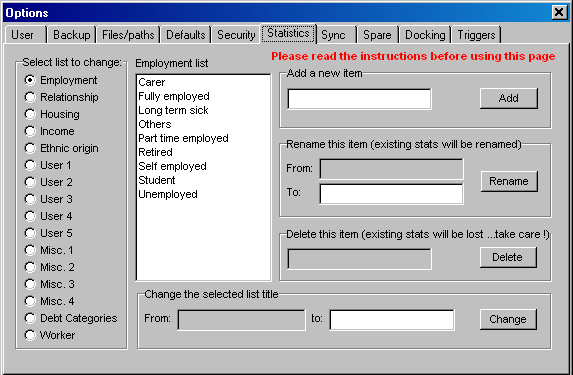
It should look something like the one below which is the PG8 default, but your
bureau may have made changes in the past
Options/supervisor/statistics screen
before changing to SE system
Now change each of the lists in turn. Complete each list fully.
Do not close down PGdebt with the changes partially complete
To empty the first list
1. Click Employment
2. Click Carer in the Employment list white box
3. Click the DELETE button...DO NOT use the RENAME button
4. Click Yes..NB. The list will sort alphabetically
5. Repeat for all list items
To fill the list with SE EMPLOYMENT ITEMS
1. Click Employment
2. Type "A self employed" ( no quote marks) in the "Add a new
item" box
3. Click the ADD button
4. Click YES
5. Repeat for all the new SE items using A-Z as the first letter in every line
Repeat this process for all the lists except relationship, which
is unchanged
Lists 9 and 10 (user 4 and User 5) are unused and available for your own purposes.
With lists 6, 7 and 8 (user1, 2 and 3) change the list title as follows
(titles 1-5 cannot be changed)
1. Click the list title button in the left list
2. Type in the new title at the bottom right box
3. Click Change
4. Click YES
After the changes the Options/supervisor statistics
window should be like this
Note the new employment list items (A-Z order as in SE lists)
Note the new list titles item 6/7/8 Household/Disability/Strategy
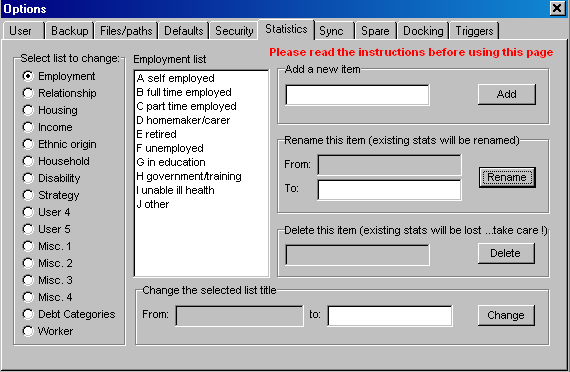
When you have finished all the lists, that completes the process
of inputting the SE stats changes
To prevent unauthorised changes, please make sure that every PC has a supervisor
password set. Keep it a secret, somewhere safe and this will prevent anyone
who does not know this password making changes to these SE stats.
If you have laptop PCs you will need to change the stats setup on these too. Use the "synch" disc procedure to do this. Please Do NOT just input the stats changes manually...it wont work properly...use the "synch" disc.
Synchronising means copying
the vital files plus some others onto a floppy and making a 'synch' disc. Then
take this disc to the next PC and use it to synchronise that one. The vital
stats file as well as standard letters, creditor database and templates will
be made the same on all PCs
To make the synch disc, start at a network PC
PG8 allows other drives to be used
rather than only drive A.
That completes the procedure on the laptop, move on the next if required.
NB. Synchronising does not affect the client files in any way...it only updates the PGdebt system files including the stats
If your PC does not have a floppy
drive A, or if PGdebt does not recognise it then you will have to copy a file
across to the laptop using any method you wish. This can occur with an old version
of PGdebt running on a modern PC. To do this:
On the server, locate locate the file called pgcommon.ini .
The best way to find this is to start PGdebt on a workstation and click
Options/supervisor/files-paths.
Observe the file path to the shared files...this is the place on the
server to find the pgcommon.ini file
Make a copy of this file onto a floppy or flash disc or whatever.
Take it across to the laptop and close down PGdebt on the laptop
Replace the same file on the laptop with the one you have taken across. On the
laptop the file to replace will be called C:\pgdebtX\common\pgcommon.ini . (The
X may vary dependent on your setup it could be 5/6/7 or 8...do not change this)
If you have
an old version of PGdebt (PGdebt 6 or PGdebt 7 earlier than 7.102)
Please remember that if you want to add a new PC to your system, you should
use the workaround procedures listed here. It will
be very rare to add a new PC. You can avoid this by upgrading to the latest
version of PGdebt, but it is not essential. The workaround will suffice.
Similarly if you want to change the stats in the future, make sure that only one PC is running when you make the changes, just as when you set the SE stats up in the first place.