| PGdebt technical bulletin 18 |
Moving PGdebt
from one standalone PC to another (not PGdebt networks)
PGDEBT 5, 6, 7 and 8 only...NOT PGdebt 8X and PGdebt 9 (see bulletin 18a for
these)
This bulletin covers all early
versions of PGdebt which do not have an internet licence key.
If you have PGdebt installed on one PC, then over the months that PC will have become customised to your bureau. Many changes will have occurred to the standard letters, FS templates, creditor database, statistics set-up etc. and you will need to make sure that all these changes are transferred when you buy a new PC and move PGdebt to that.
Unfortunately, because old versions of PGdebt do not recognise a disc in drive A on Windows 2000 and later, the process cannot be automated. NB. Do not use the PGdebt 'backup' procedure which is designed to backup and replace files on the same PC, not move them to another which may not be set up the same way.
(If the original PC has PGdebt5 installed (PG5), this procedure will not move the creditor database which needs to be converted to a new format, see Tech. bulletin 05 for details of how to convert this.)
You will have
to make several steps.
Step 1. Locate important files on the old PC
On the old PC start PGdebt.
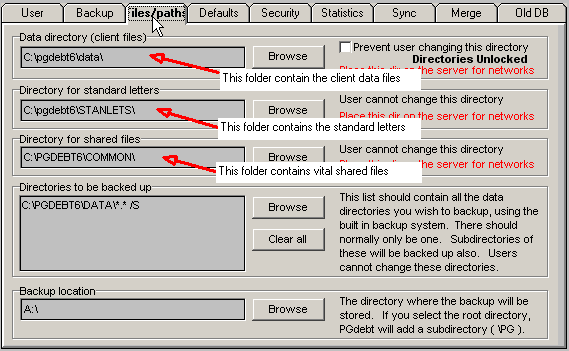
Then go to the Options/supervisor/file-paths screen. This screen will be similar to the one shown below and contains the locations of your client data files, standard letters and shared files.Observe the folders listed on this screen and make a note of them on a piece of paper, then close PGdebt.
With PGdebt7/8/9 there will be another folder for draft files, include that as well for these versions. At this point, there is no need to consider the bottom 2 boxes, which are concerned with backups.
Step 2. Copy these files onto a memory stick
Step 3. Install PGdebt on the new PC
Just install the program using the PGdebt CD if you have PG5,6,7 or 8...see the manual for instructions if required.
If you are upgrading to a later version of PGdebt, install the new version now, not the old one.
Make sure it runs properly, it should run OK, but of course your data will not be available yet.
Step 4. Copy the important files from the floppy or other media onto the new PC
Step 5. Check configuration on the new PC
Step 6. Optional items
The procedure so far does all that is really necessary, but there are certain other files that could be moved over. These are located in the main PGdebt folder (C:\pgdebt6 in the example above). Depending on the version of PGdebt certain of these files may not be present, but if they are there you could locate and move them over. It is not essential to move these files, but if you have extensively customised the FS template, you can save having to do this again by moving the template files (PG5 and 6 only).
| PGdebt 5 and 6 customisation files |
| MTEMPLAT.PGT (FS template) |
| WTEMPLAT.PGT (FS template) |
| AUTOFIX.TXT (spellcheck) |
| BADSPELL.TXT (spellcheck) |
| CUSTOM.DIC (spellcheck) |
| PGSUBST.INI (stats) |
| PGPOS.INI (screen views) |
Finally
When you are absolutely sure, (this may take
a day or so !) that everything is OK, then delete PGdebt from the old PC. Delete
the data files manually and use the REMOVEPG program to remove PGdebt itself,
this will be found under Start/programs/PGdebt. This is important as you do
not want to have two copies of everything. Also this information should be removed
before disposing of a PC to protect client confidentiality. You should really
use a secure deletion utility to remove data from a PC before disposing of it